Appearance
Libraries
The Libraries screen includes three tabs: Door Jobs, Door Data, and Feature Groups.
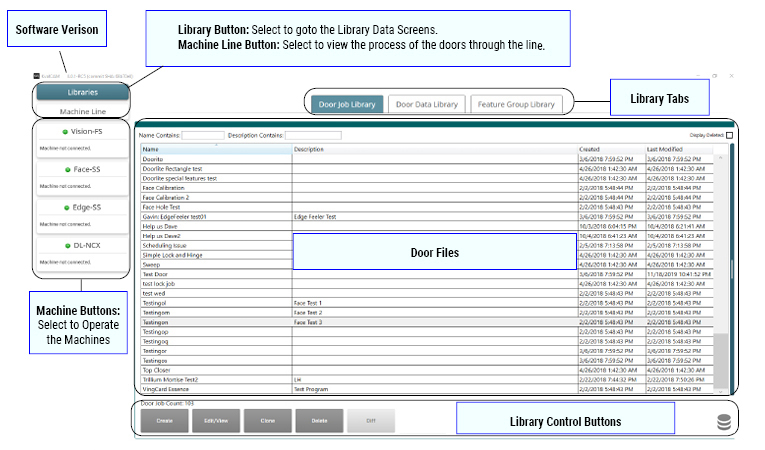
These libraries enable you to:
- Create, edit, clone, delete, and download door jobs and door templates.
- Powerful and flexible database of door cuts.
- View the entire process of the machine line, queued jobs, quantity and remaining doors, and status of each machine. Some line control is available.
The table below shows the details of each KvalCAM library.
| Detail | Door Job Library | Door Data Library | Feature Group Library |
|---|---|---|---|
| Saves Cut Information | Yes | No | Yes |
| Saves Door Parameters | Yes | Yes | Yes |
| Number of Feature Groups Allowed | Many | 0 | 1 |
| Load Work Onto Machines (Cut Doors) | Yes | No | Yes (For testing purposes) |
Navigating the table
- Click the desired table heading to sort by Name, Description, Created or Last Modified.
- Use the input fields at the top to filter by name or description.
- Check the Display Deleted checkbox to view or recover recently deleted door files.
- Change the column widths by selecting the column border and dragging to the desired size.
Display Deleted
Check this box to view deleted door files.

- Select the Display Deleted Check Box, located in the upper right hand corner.
- Deleted files are highlighted in red.
- Select the file to be recovered.
- At the bottom of the page, click the Restore button to recover the file.
Available Actions
Use the buttons at the bottom of the screen to create, clone, edit, or delete jobs or templates. Lock editing capabilities and refresh tabs are also available.

Create
Depending on the library selection, select this button to create a new Door Job, Door Feature, or Door Data.
Edit/View
Edit or view a Door Job, Door Feature, or Door Data.
- Select a file from the Door File table.
- Select the Edit/View Button to go the Job Screen.
TIP
Double-click a Door File in the table to go straight to the file screen.
Clone
Use the Clone button to duplicate a door file.
- Select the file to be cloned from the table.
- Click the Clone button.
- At the pop-up window rename the file and update the description as needed.
- Click the Save button to complete the process.
Delete/Restore
The Delete Button removes files.
NOTE
The Delete button turns into the Restore button when the Display Deleted checkbox is checked.
- Select the file to be deleted from the table
- Select the Delete Button.
- At the pop-up window select Yes to delete the file.
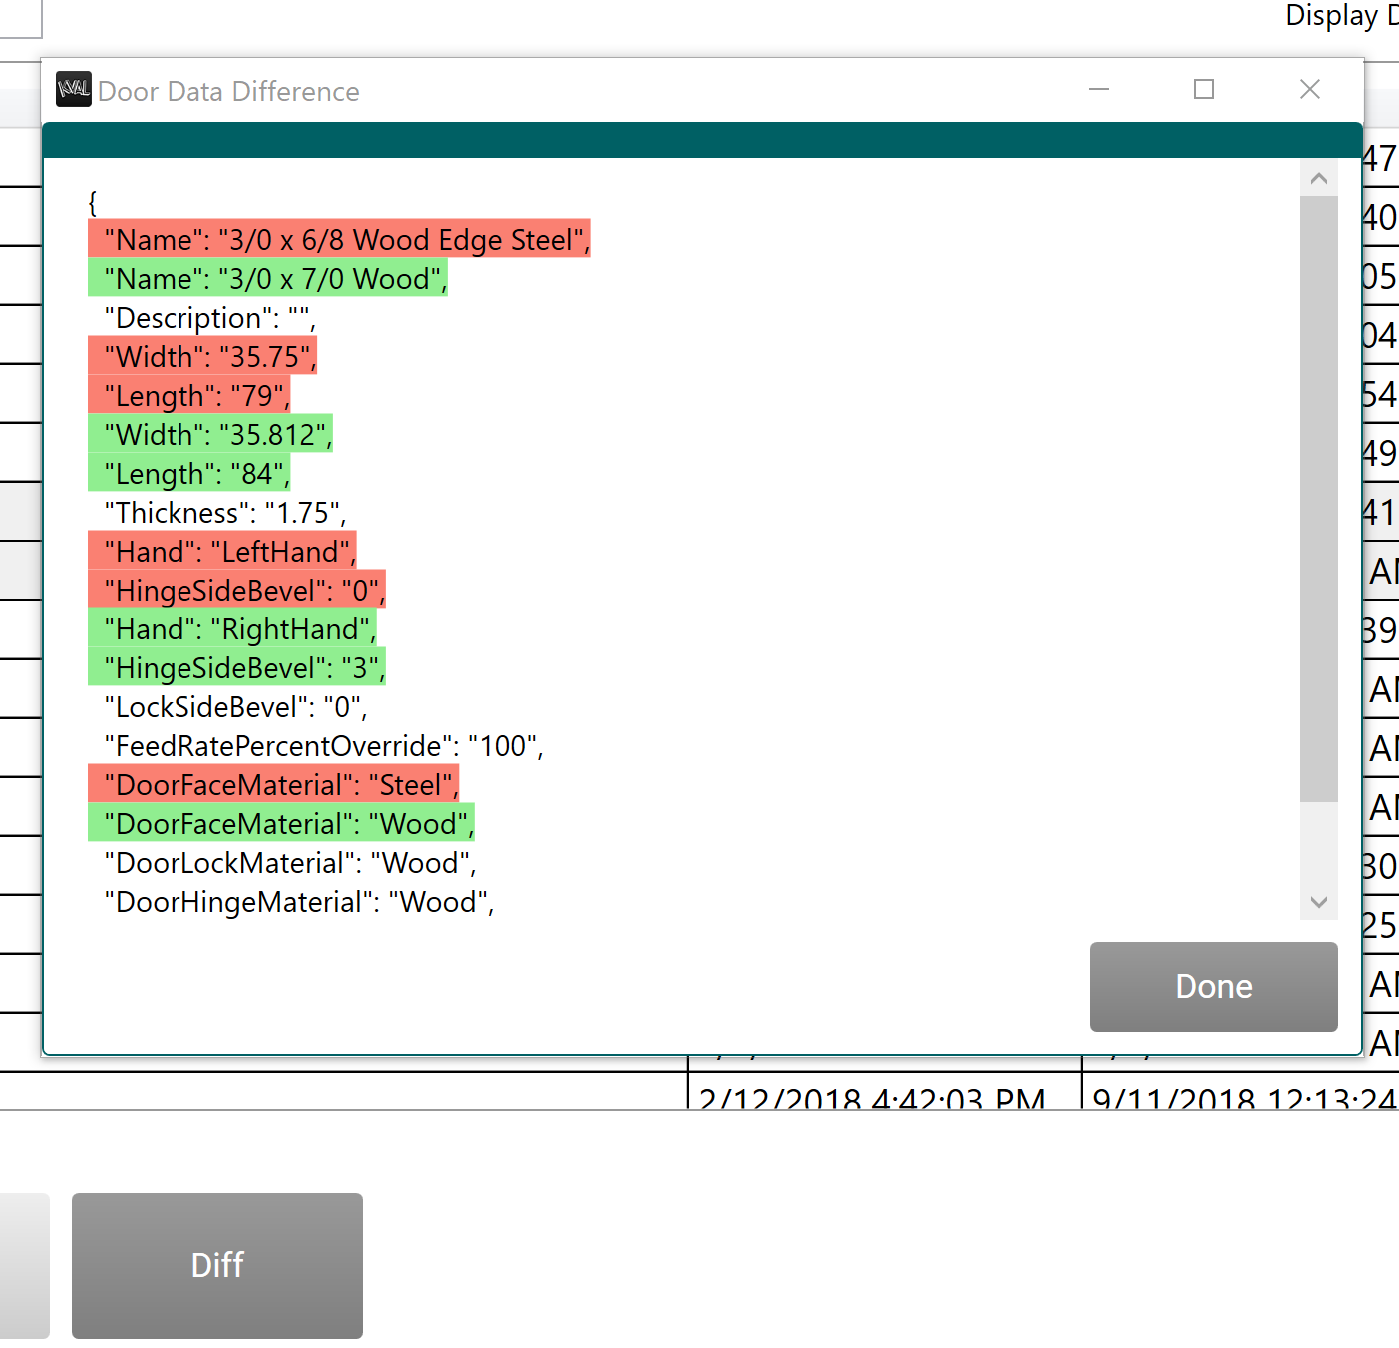
Diff
Use the Diff button to compare two files.

- Select two files to compare.
- Select the Diff Button.
- In the popup window, check for color coded differences.
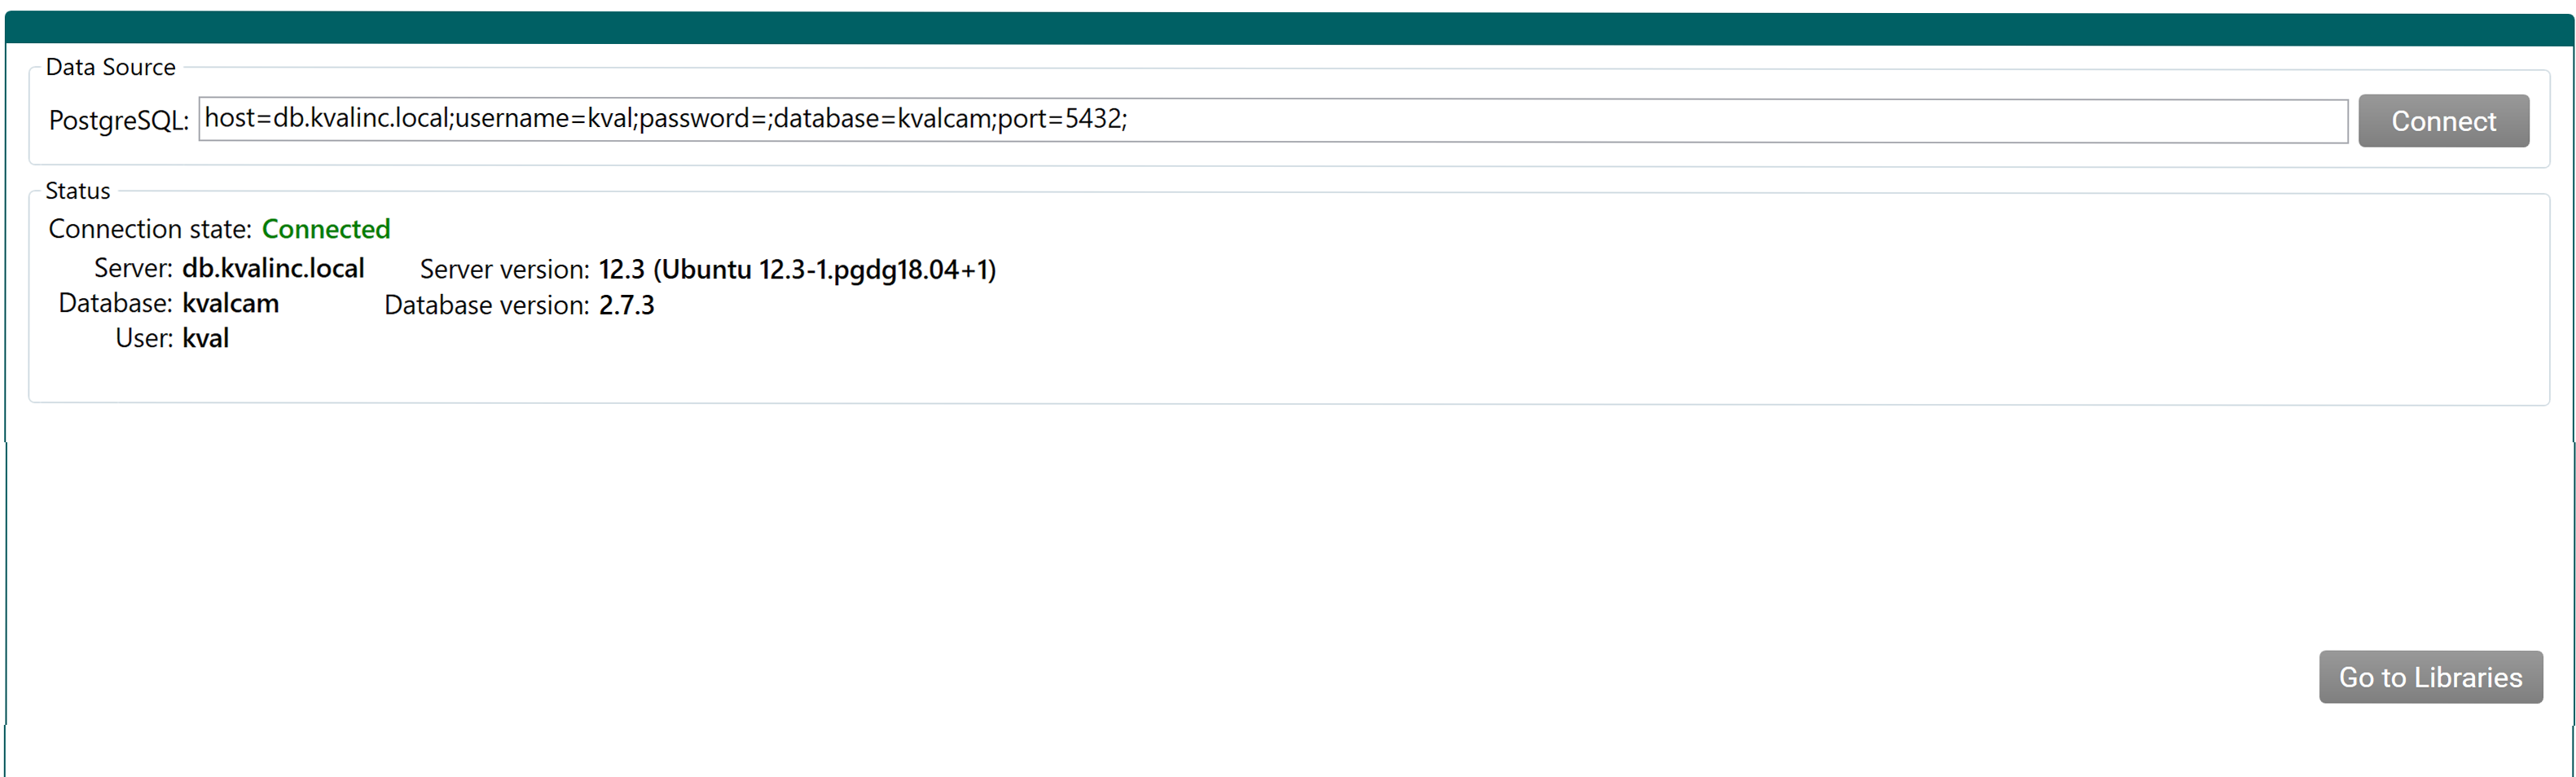
Database
In some instances, multiple databases may be accessed.

To select a different database:
- Click the Database icon.
- At the Database screen, enter the desired database path into the PostgreSQL text box.
- Click the Connect button.
- At the bottom of the screen, click the Go to Libraries button.
Door Jobs
The Door Job Library includes the files that contain all the files to create a processed doo. A hidden panel to the right displays revision information about the selected file. Highlight the file in the table, click the Edit/View button to go to the Door Job screen.
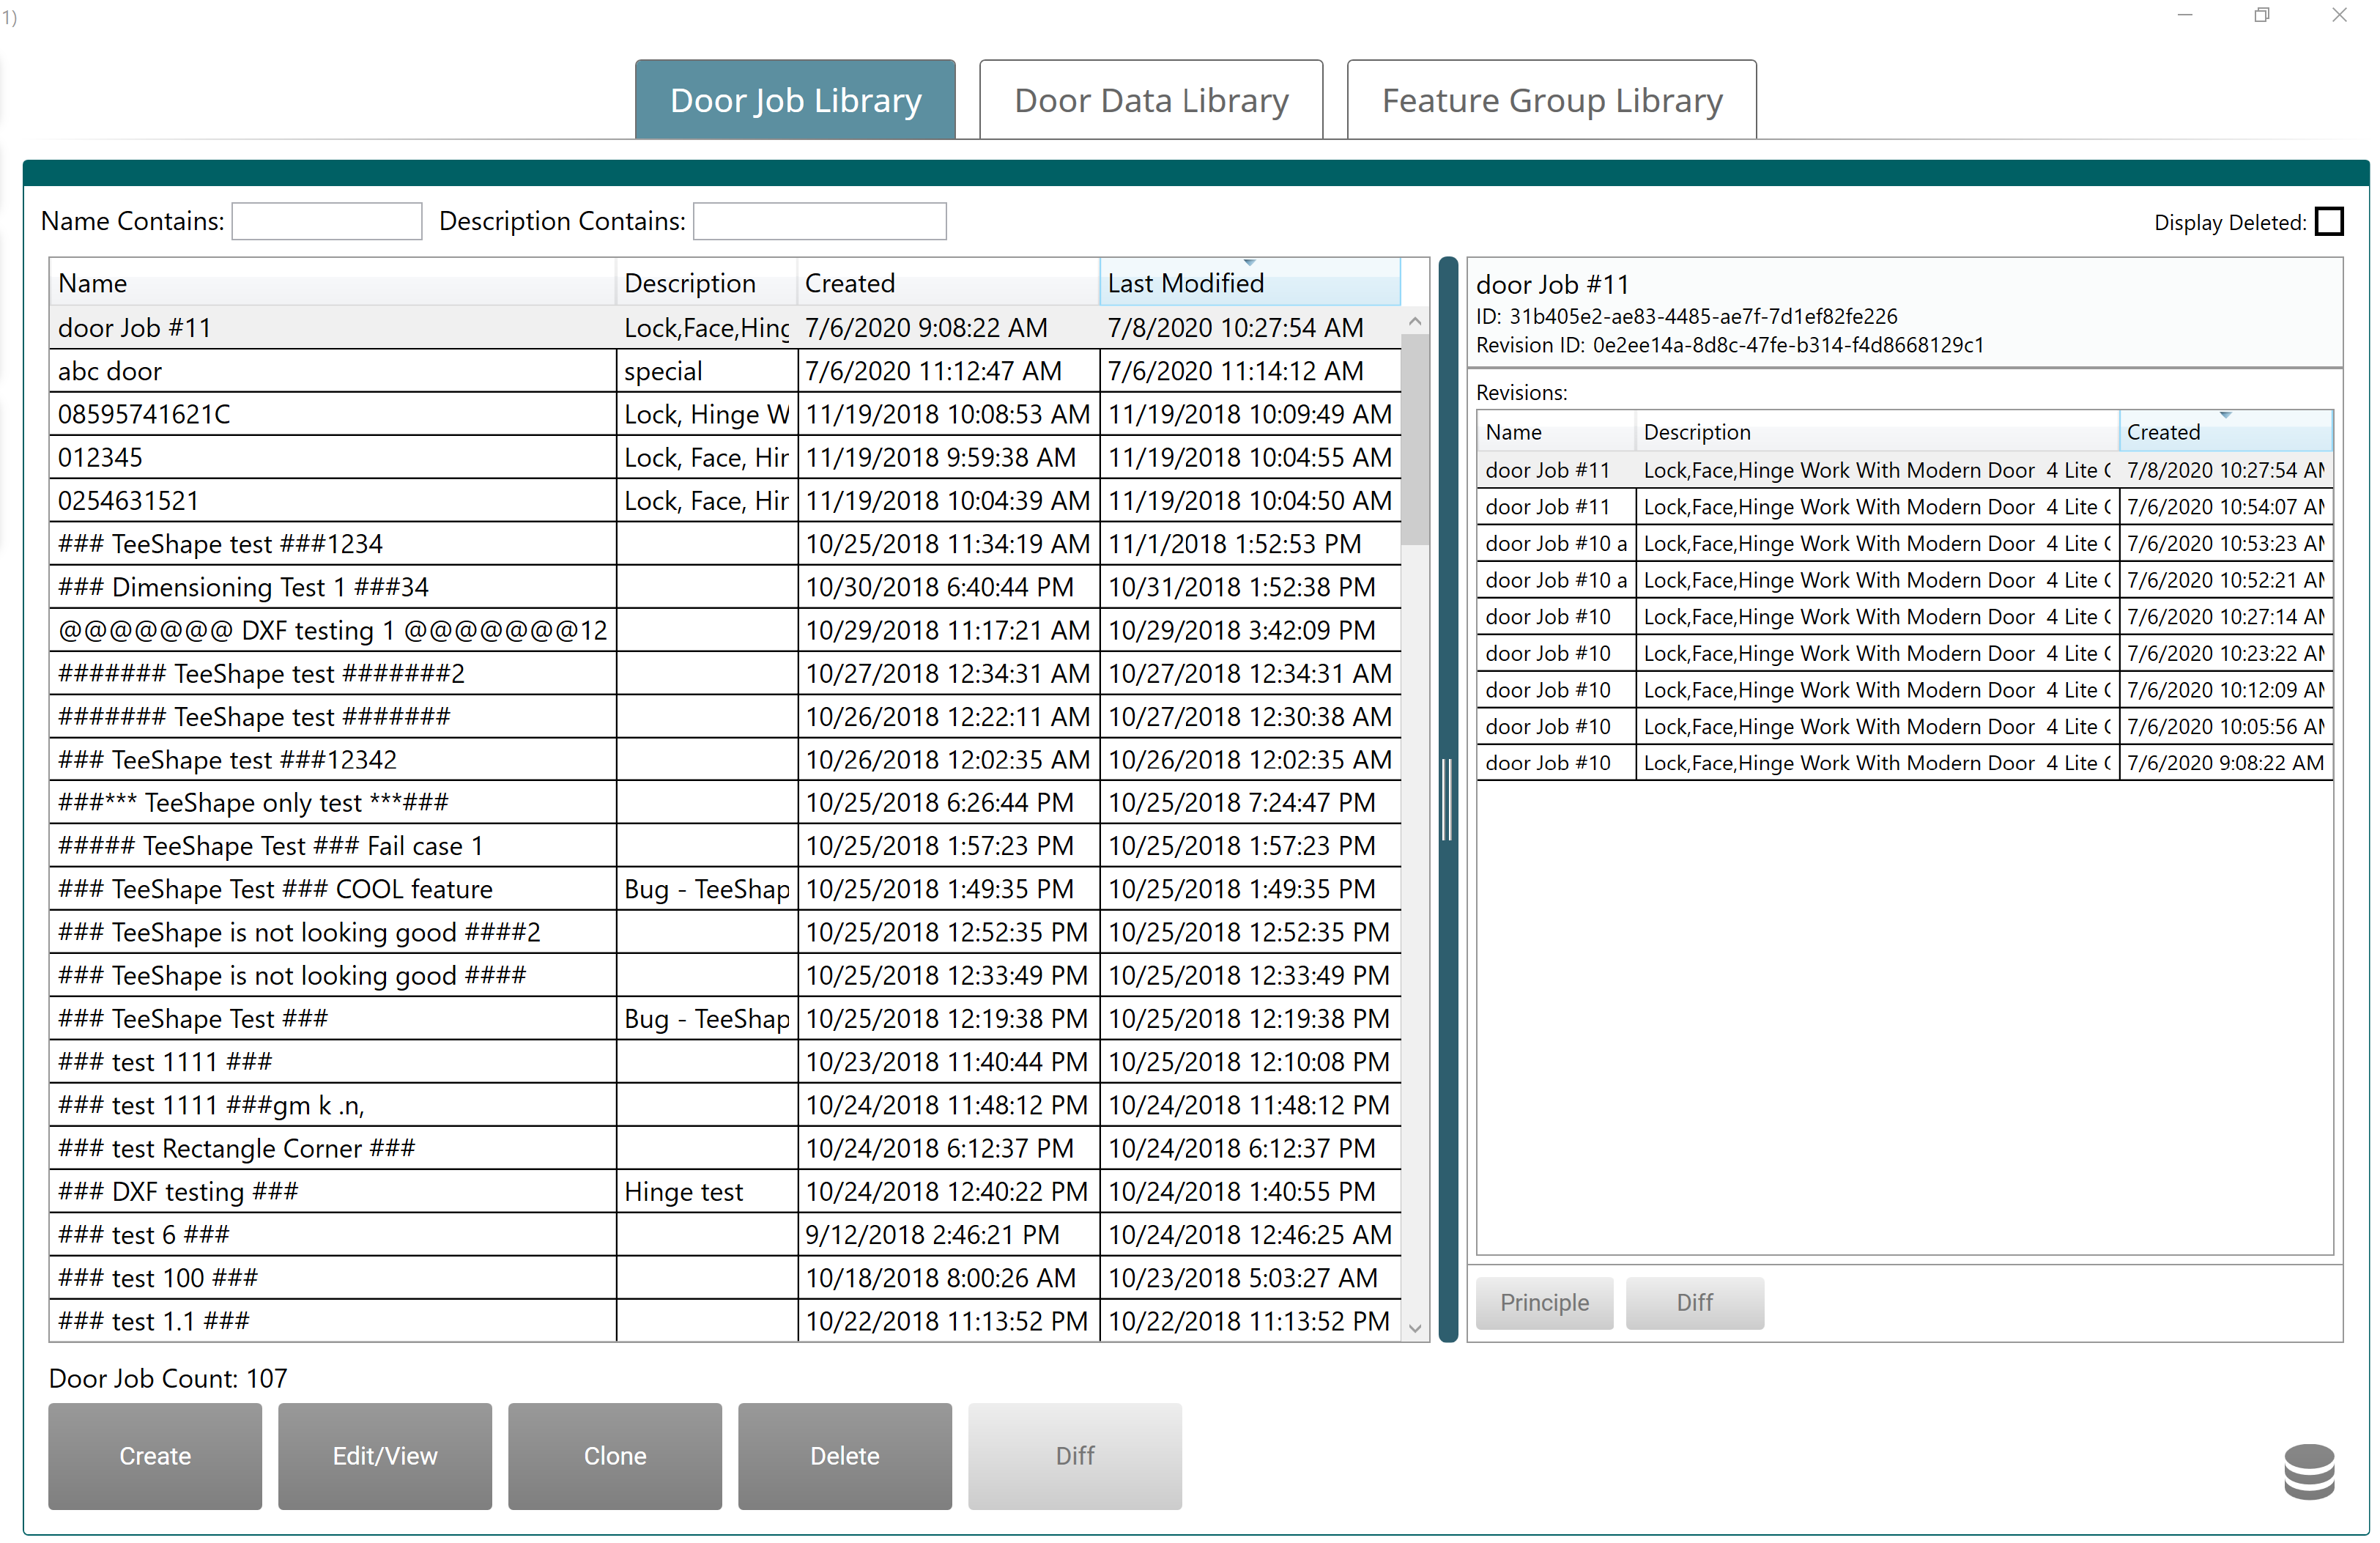
All process information to process a door is collected or created at this screen.
Door File Creation
The tabs to create door files are located at the left-hand side of the screen. Each tab is described in this section.
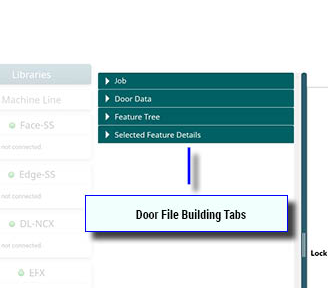
- Job: Name the file.
- Door Data: All information about the unprocessed door slab.
- Feature Tree: Feature Groups and Features applied to the door.
- Selected Feature: Details about the features applied to the door.
The Job Tab
Assign a name to the Door Job. Add a description to the Door Job, for example customer information, door parameters, or work order information.
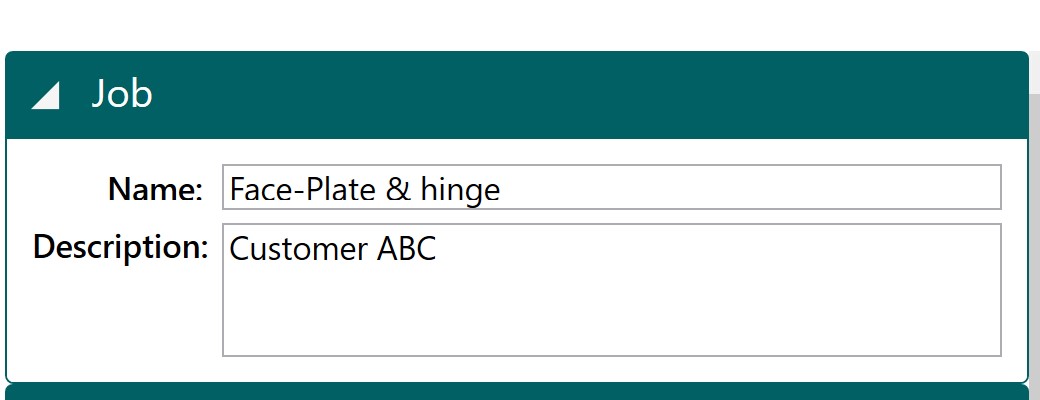
- Name: Enter a filename for the Door Job.
- Job Description: Enter descriptive text for the file.
Door Data
The Door Data structure defines all the properties of a door to be used by KvalCAM for processing. Detailed information can be found in the Door Data section.
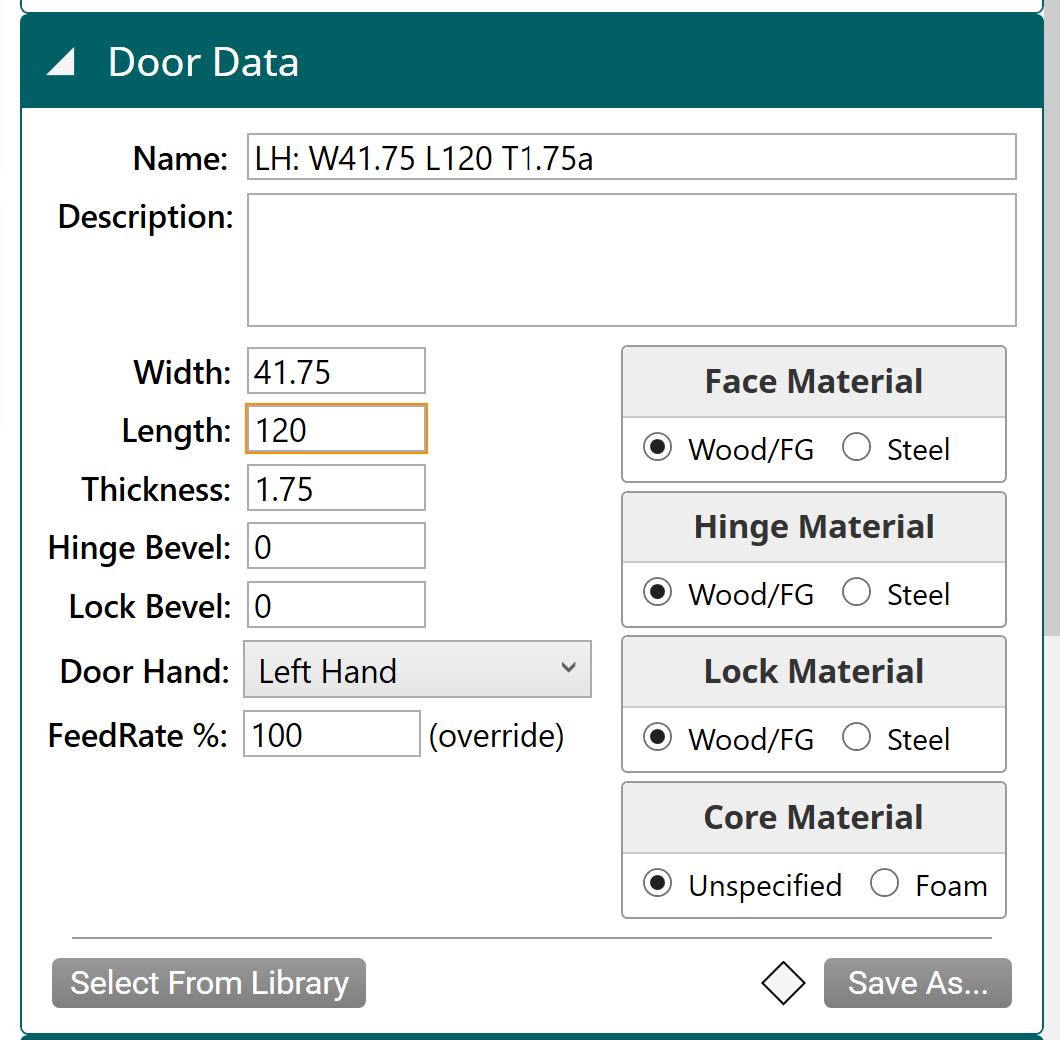
- Assign a door data name, door description, and door specifications.
- Enter properties such as length, width, and thickness, and non-dimensional properties such as door hand or material.
- Using the Select From Library button, door data can be pulled in from the Door Data Library.
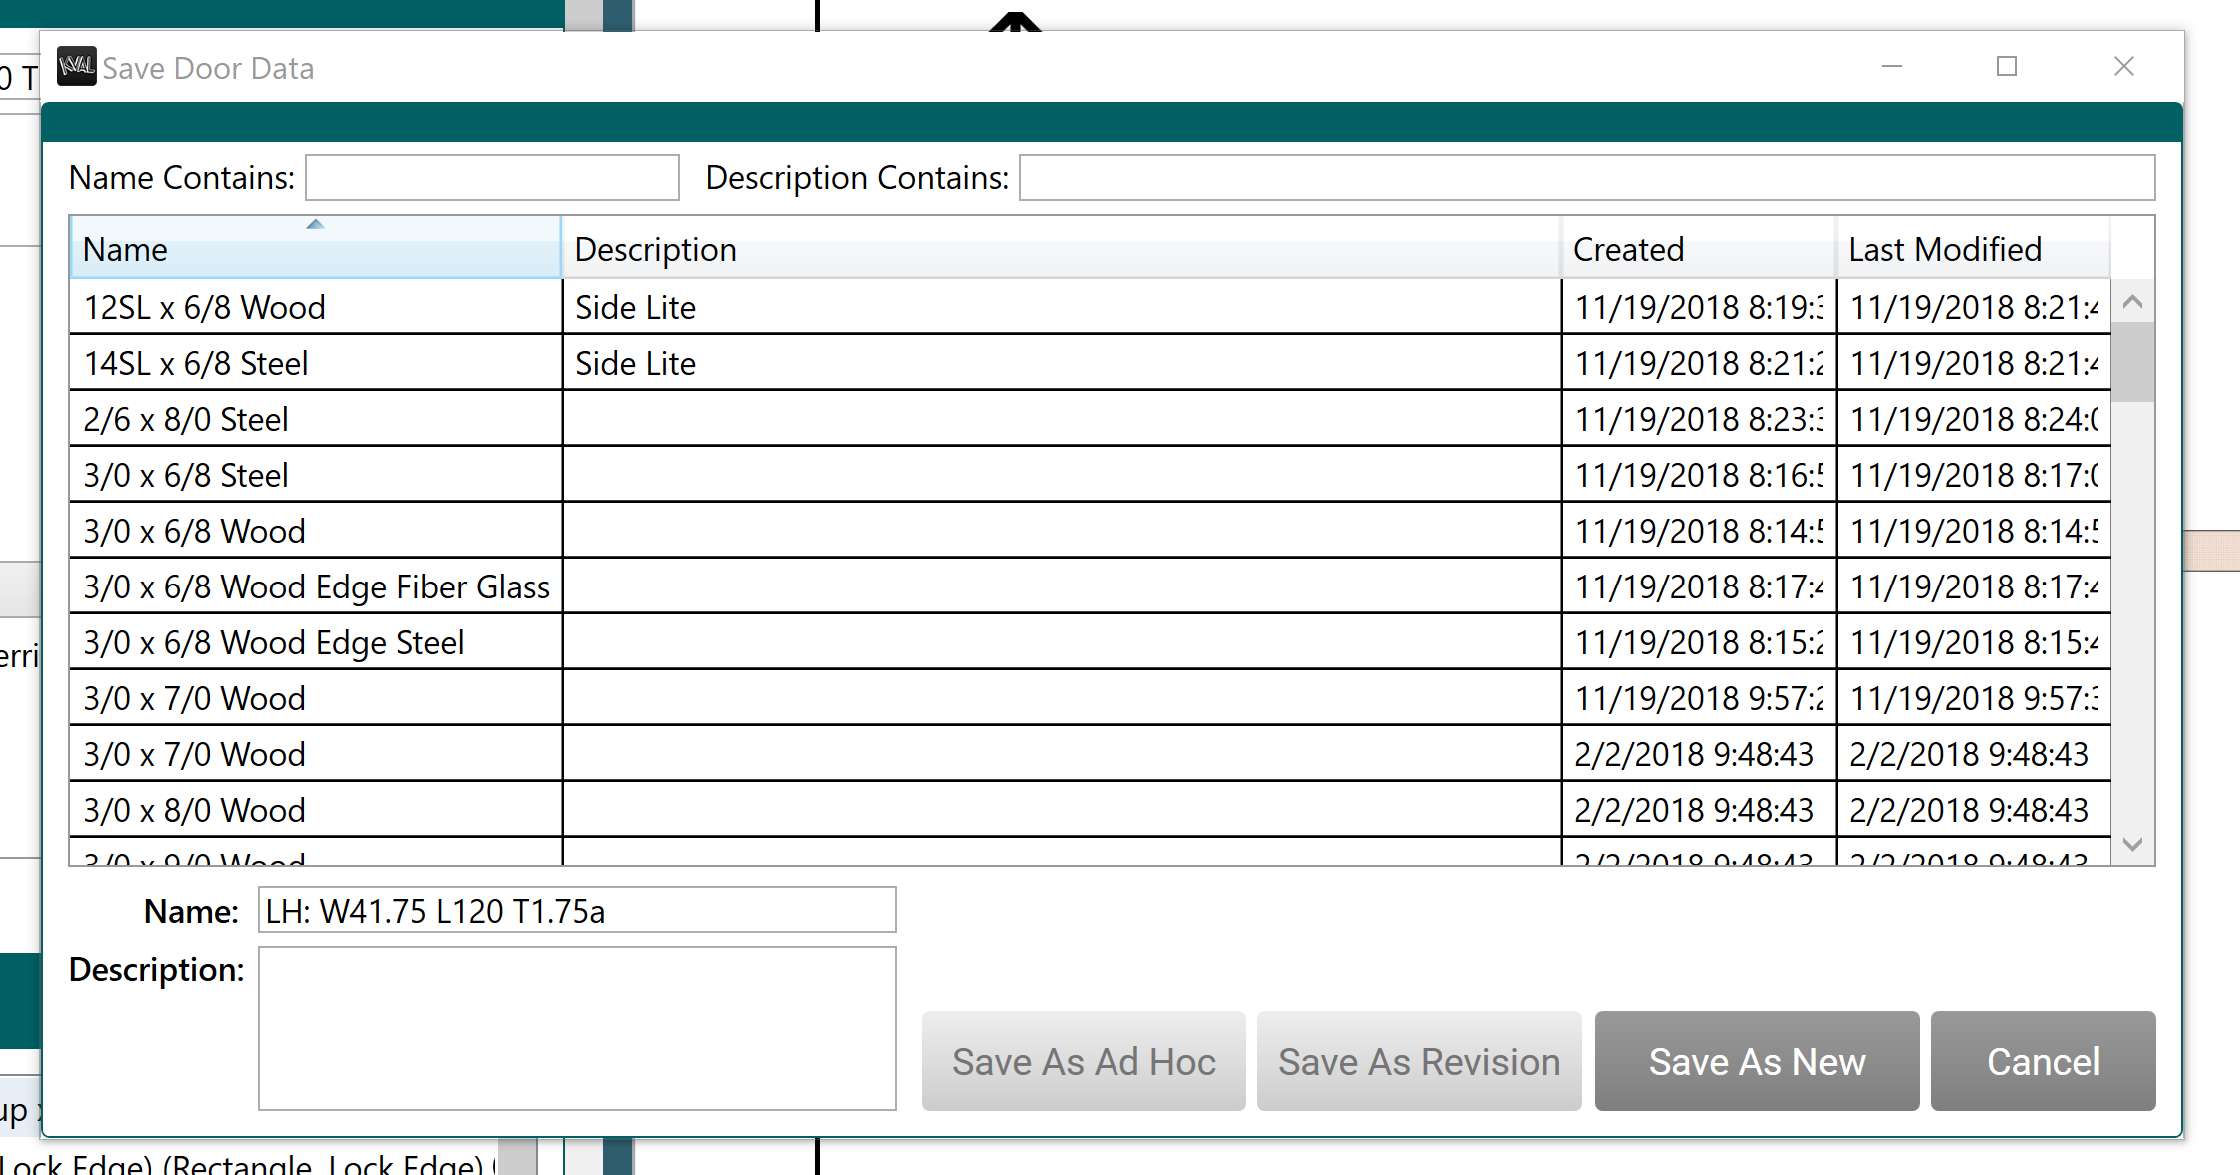
- Using the Save As... button, save as Ad Hoc, Revision, or New.
Feature Tree
View, edit, or create features of the door. A Feature Group is a container in which individual or multiple features can be loaded to process a door. Feature Groups operate at the top level in the feature tree, from which child features branch out.
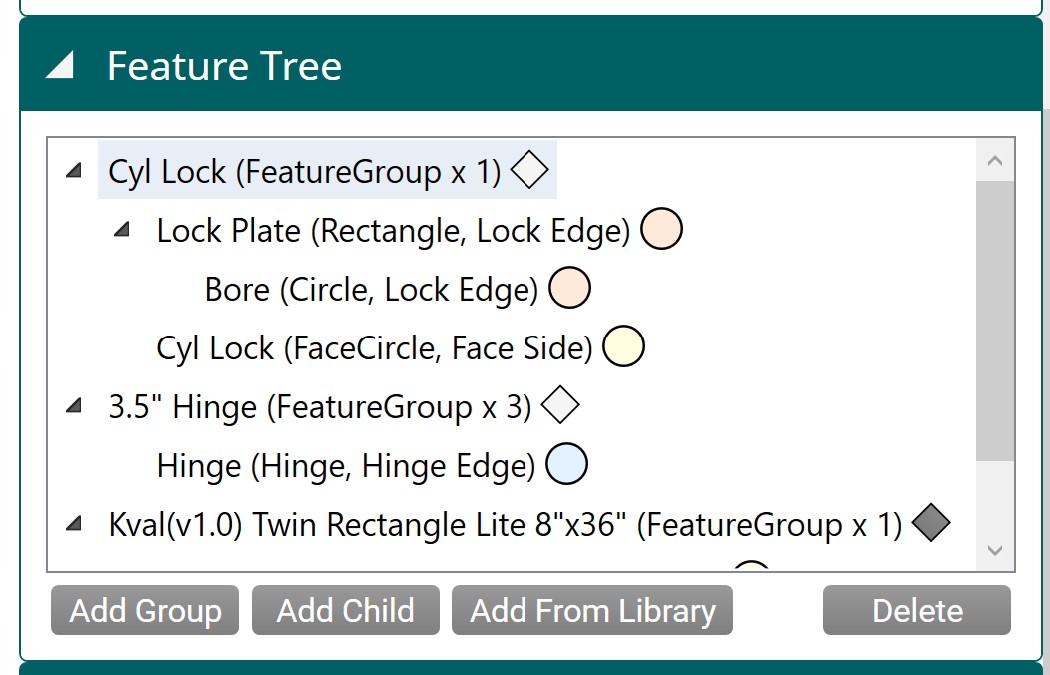
Feature Group
A KvalCAM Feature Group represents a grouping of Features to be run on the door. The Feature Group defines references and locations for positioning a group of features on the door in a machine agnostic way. Feature groups can be saved to the Feature Group library in KvalCAM for repeated use.
Add Group
Click to create a new Features group. Can also be created in the Features Details menu.
Add Child
Select to create a new child to a group.
Add From Library
Select to add a template from the Library.
Tips
- Color Codes: Indicators next to the Child Features are color coded to reflect the location on the door. (Hinge Edge, Lock Edge, Hinge Pivot Face, Opposite Hinge Pivot Face, Top End, Bottom End).
- Validation: If a cut is not correct, the background will turn orange and the offender will be highlighted by an orange rectangle. Use the Validation tool to find the error.
- Cut/Copy and Paste: Select a Group or Child. Right click the mouse button. Choose Cut or Copy from the list. Position mouse at the desired location in the tree. Right click and choose Paste.
Feature Details
Feature Groups can have their own L (Length), T (Thickness), and W (Width) locations . This allows the user to quickly move groups to new locations or to duplicate groups in multiple locations.
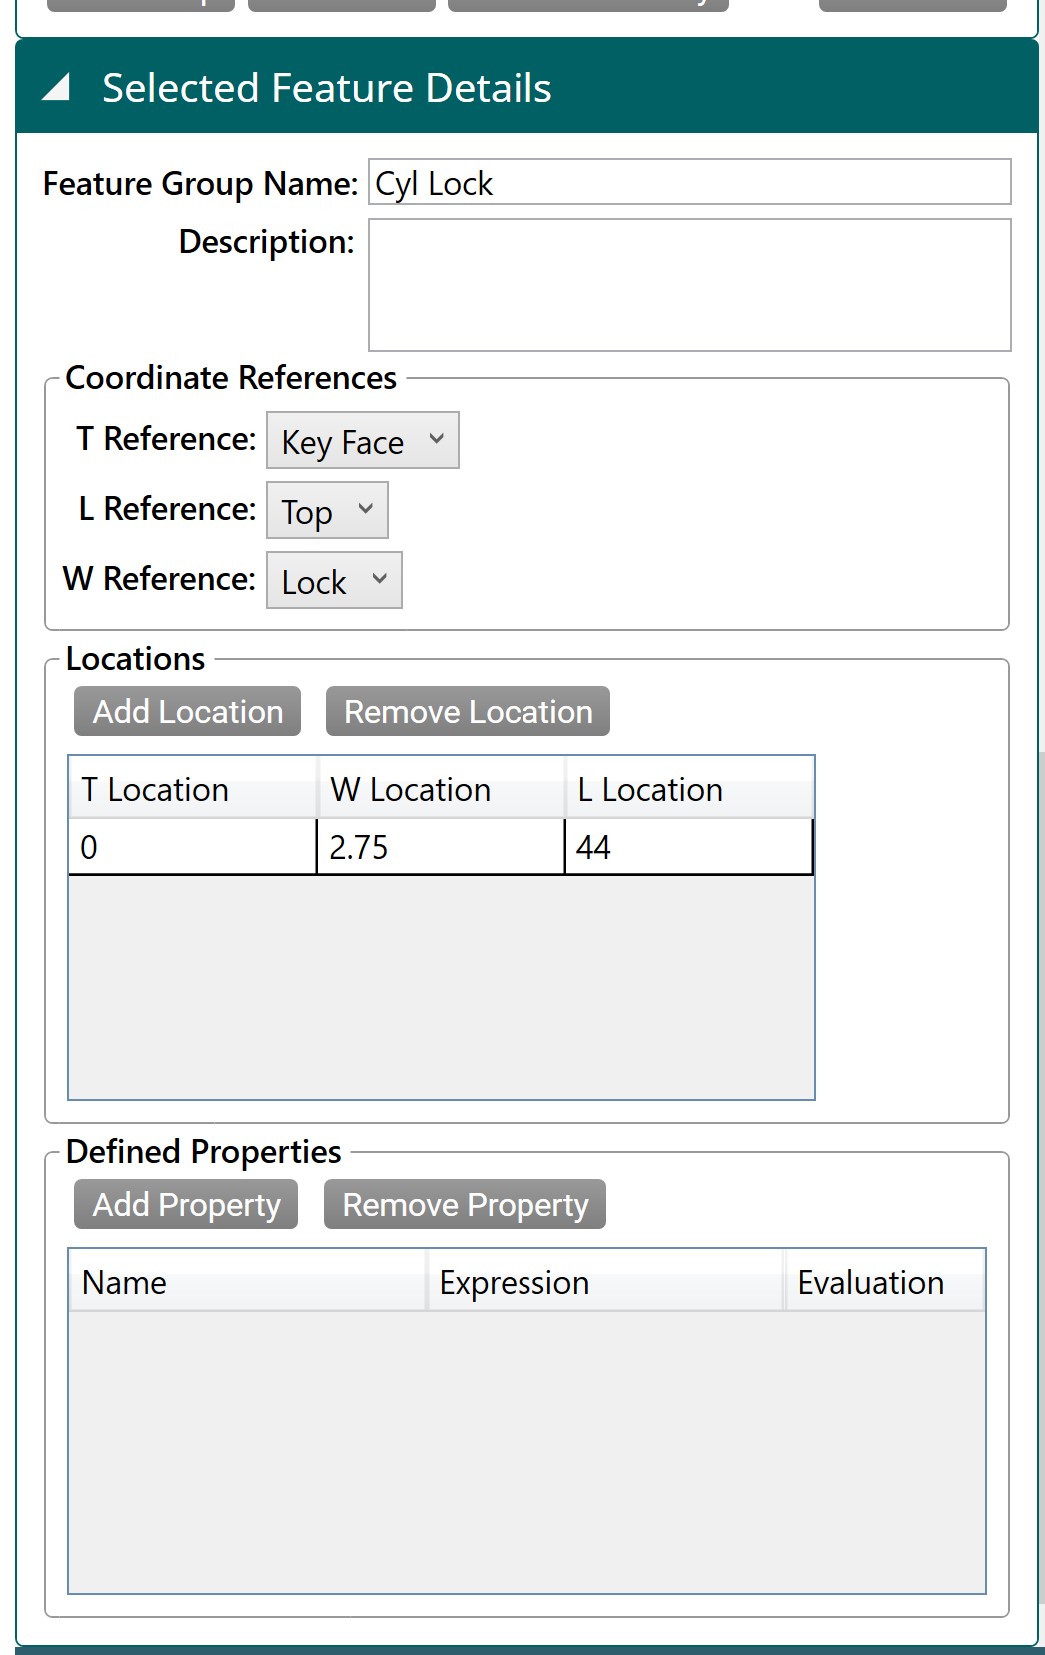
Feature Group Name
Add a descriptive name to the Feature Group
Description
Add descriptive information about the Feature Group
Coordinate References
Set the reference in relation with the cut. The reference option is displayed in the Job Preview section.
Thickness (T) Reference
- Hinge Pivot Face
- Key Face
- Opposite Key Face
- Opposite Hinge Pivot Face Length (L) Reference
- Bottom
- Top
Width (W) Reference
- Lock
- Hinge
Locations
Add, Remove, Edit the location of the door cuts.
Defined Properties
Create a custom property to be used for the selected Feature Group.
Feature Details (Child Level)
Features are created by adding children to a feature group. All features are specific cuts that can be made on a door.
Feature Name
Add a descriptive name to the feature.
Feature Type
Defines the type of cut. From the dropdown menu select the desired cut location:
- Circle
- FaceCircle
- FaceRectangle
- Hinge
- Rectangle
- TeeShape
- LiteCutout
Door Side
Select the portion of the door to be a reference. From the dropdown menu select:
- Bottom End
- Top End
- Hinge Edge
- Lock Edge
- Hinge Jamb
- Lock Jamb
Data Table
Parameters of the cut. Includes Hinge Predrill locations.
Manage Augmentations
Add augmentations to the created. Augmentations are created at the factory to aid to common cuts.
Door File Controls
The Control Buttons are located at the bottom of the screen.
- The first 4 buttons are related to saving or editing the Door Job.
- The last button (Add to Queue) starts the door cutting process.

Editing Buttons
These buttons control the file content and actions.
Save
Select to save all a new Door Job or save edits to a Job (password protected)
Save as New
Make adjustments to an existing cut pattern and save as another file.
Cancel
Select to quit this screen and jump back to the Library screen.
Validation Report
If errors are displayed, select to troubleshoot the issue.
Export to DXF
Select the Export to DXF button to create a blueprint of the Door Job. A background program will translate the parameters to create a .dxf file.
To view the file, use a program that opens .dxf files. (e.g., AutoCAD® DraftSight®) Use this blueprint to share for review.
Add to Queue
The first step of door processing.
- Enter the quantity of doors to be processed in the Door Qty. input.
- Click the Add to Queue button to start the process.
- The Door Control screen will be displayed to visually follow the door processing.
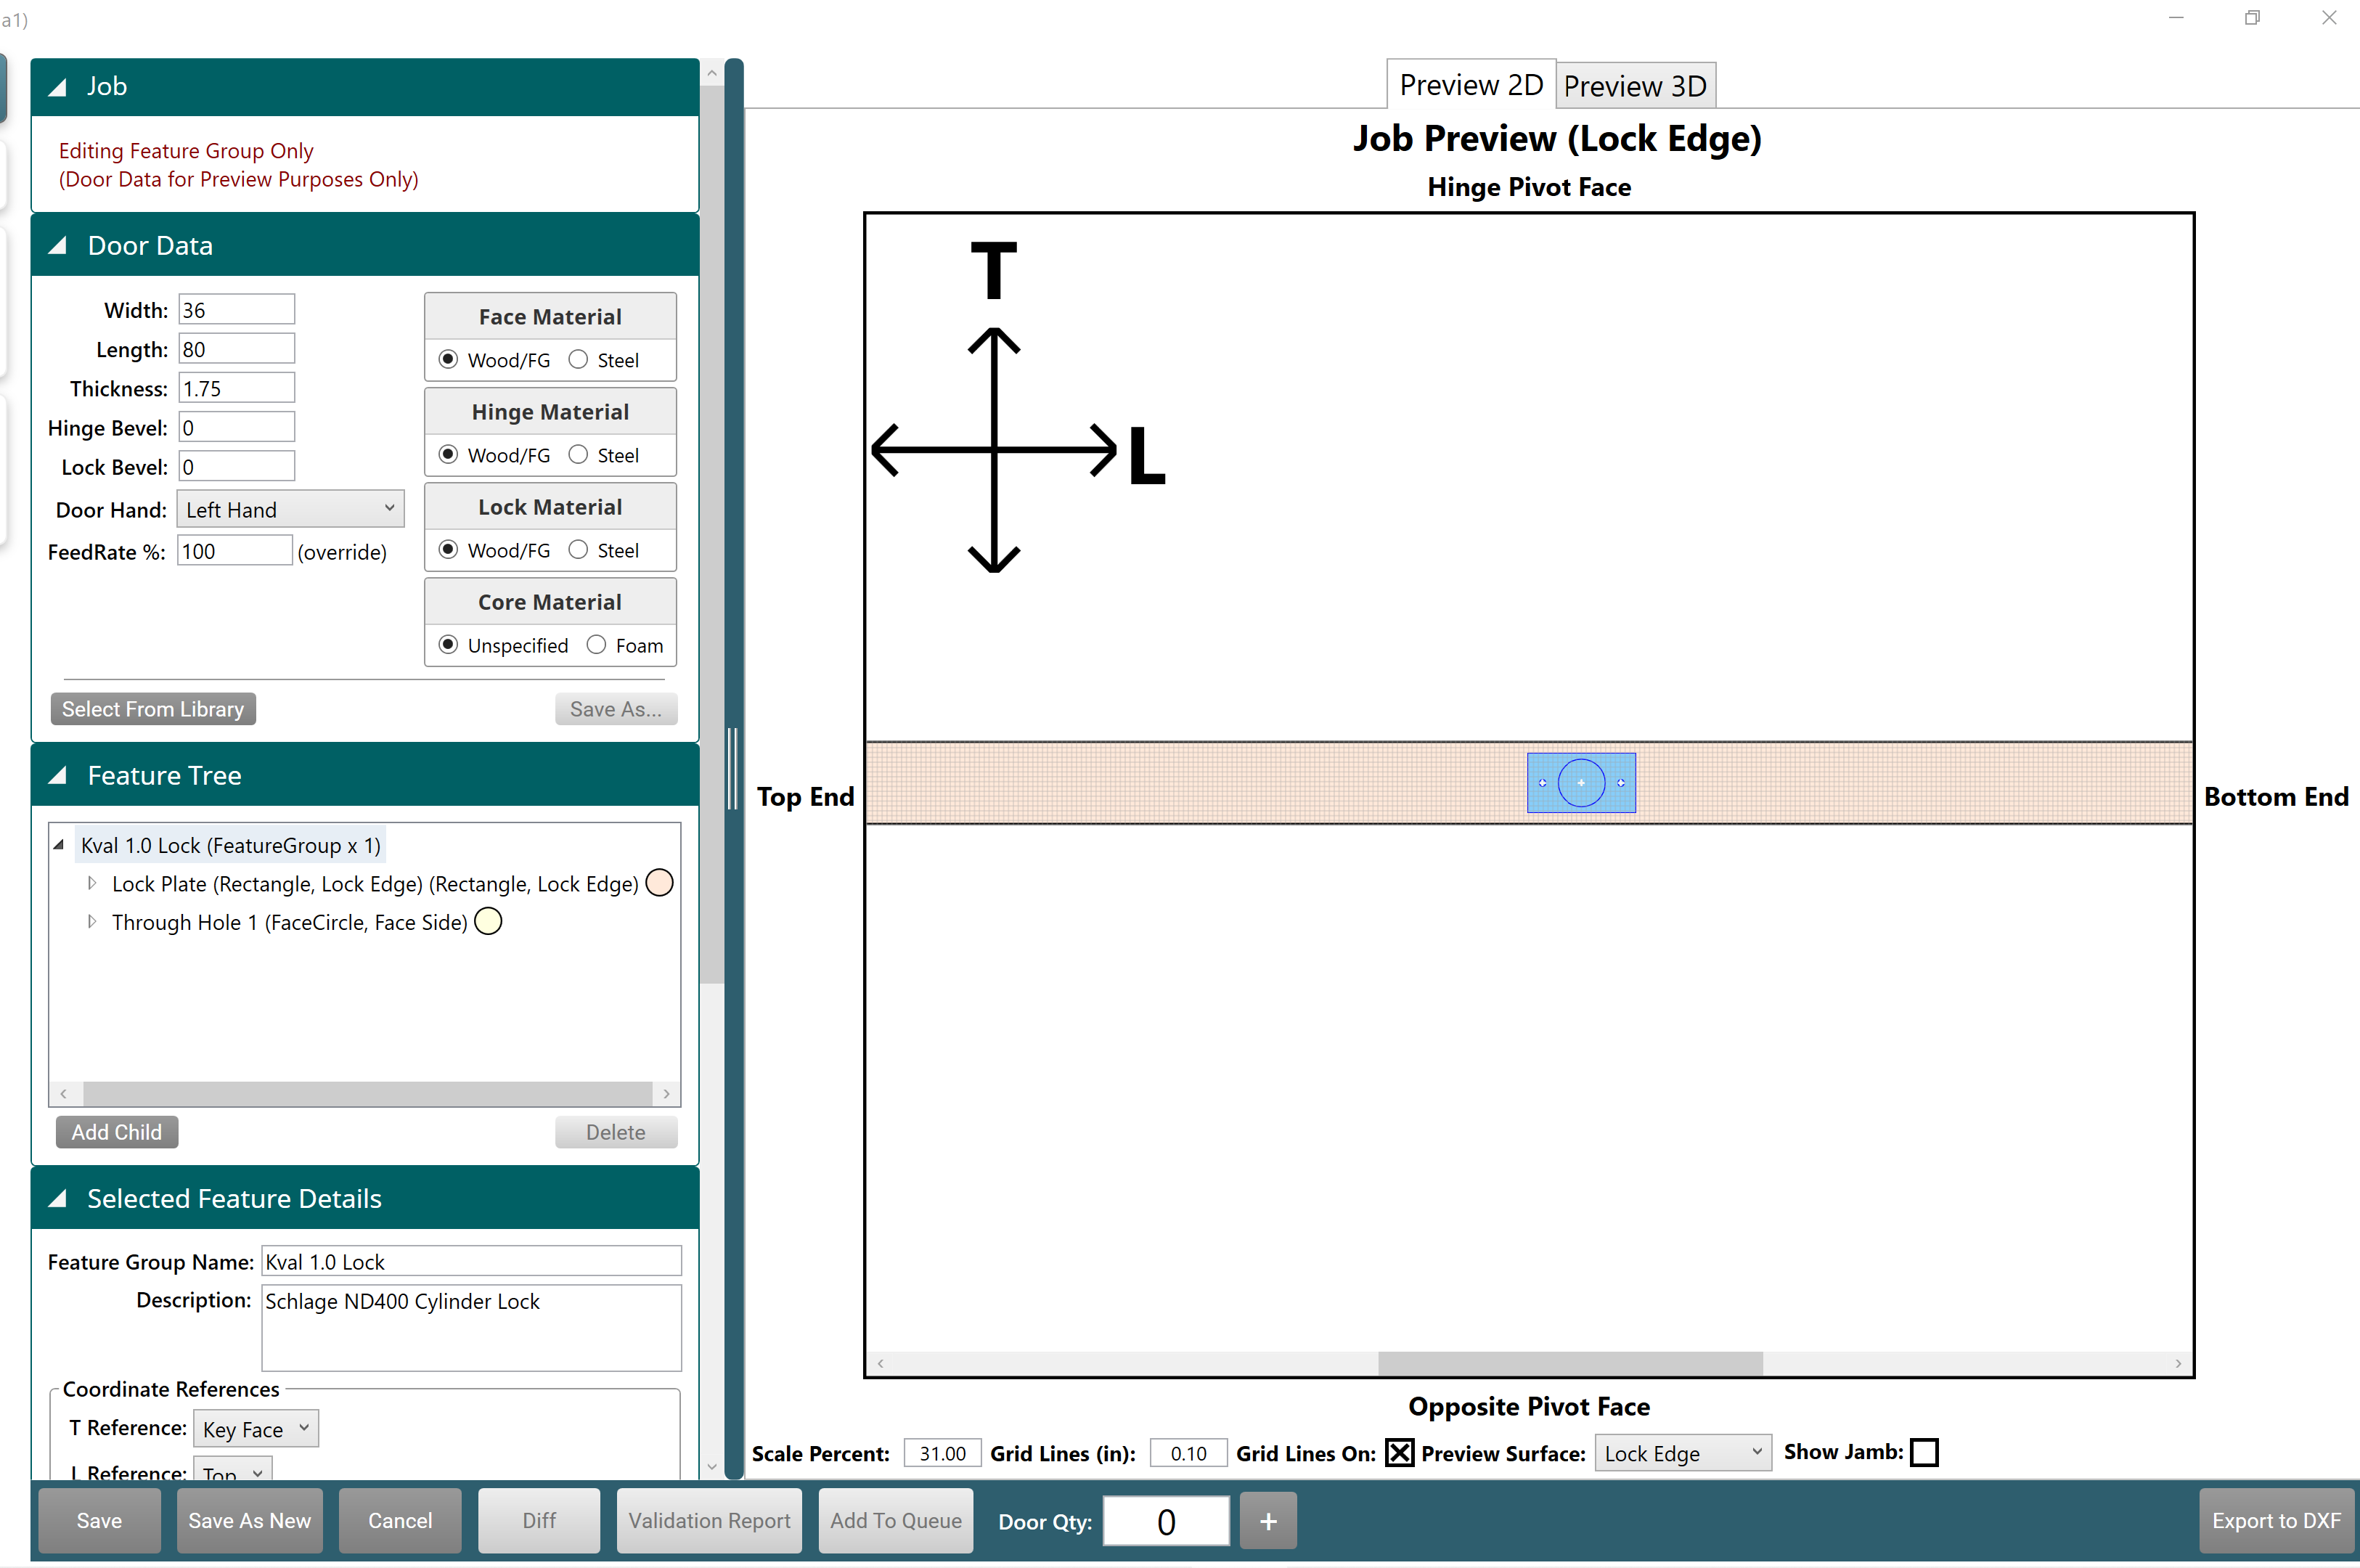
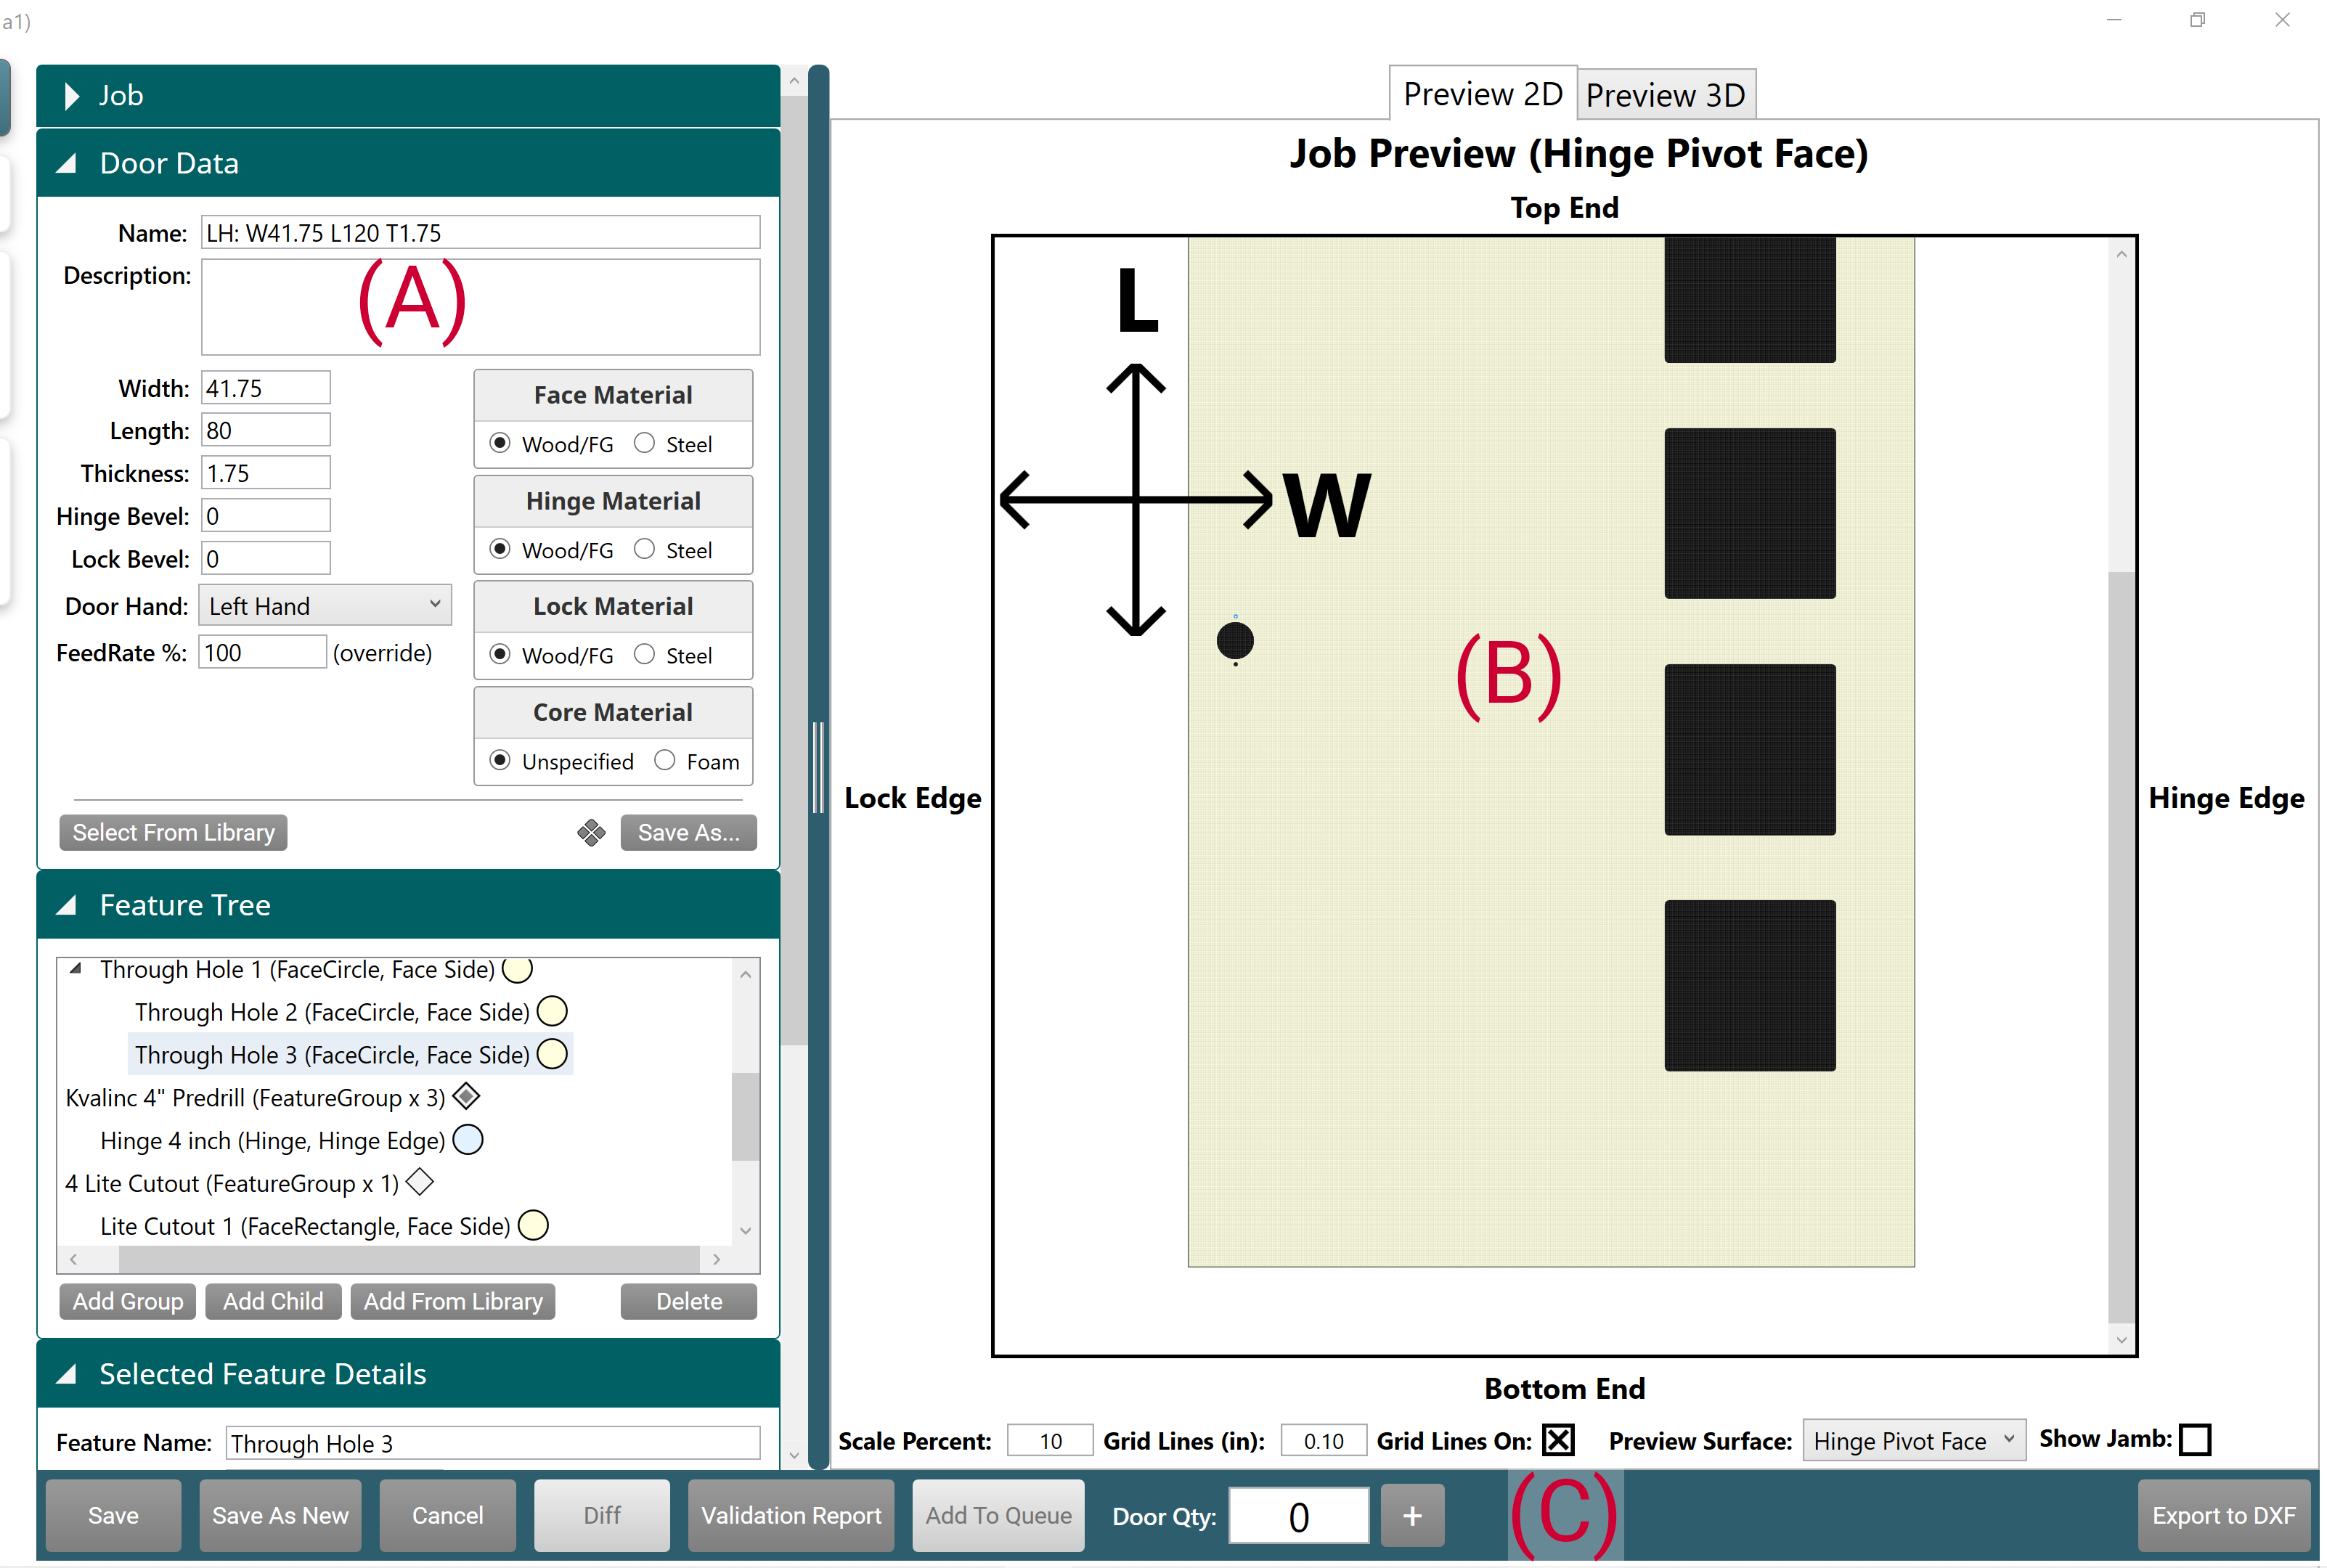
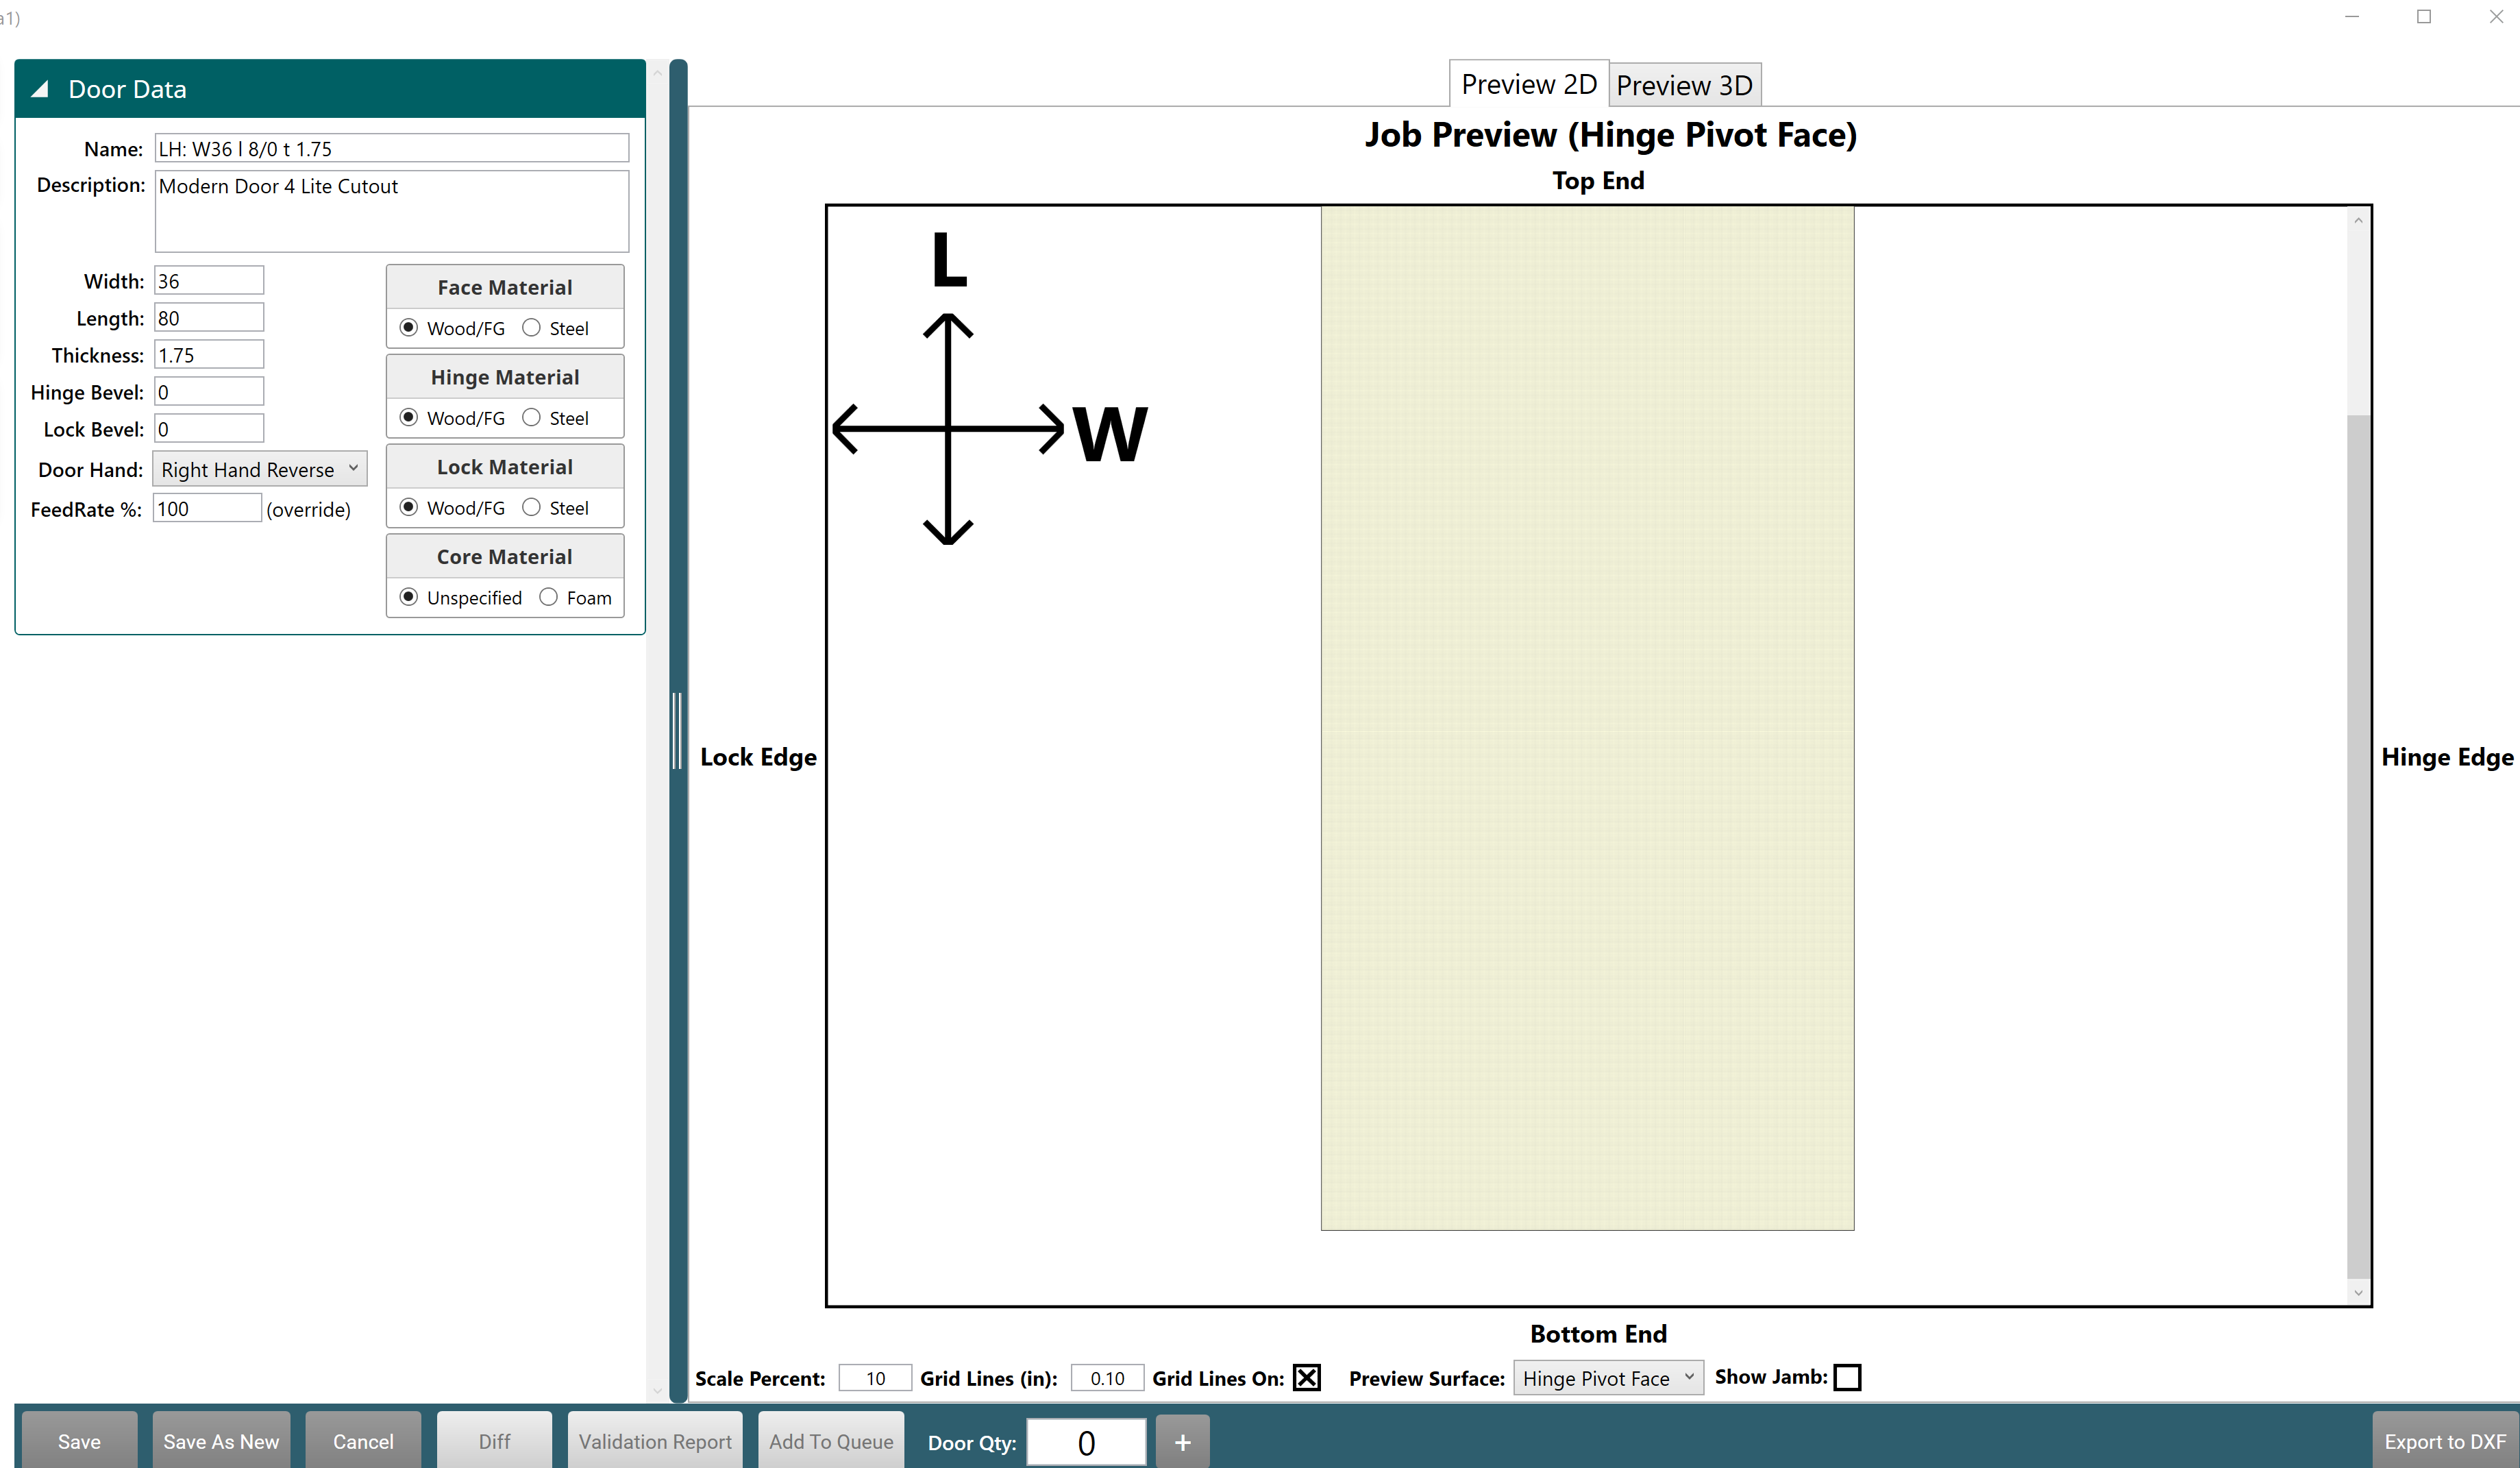
Job Preview
Viewing the door graphically before cutting offers opportunities to edit or verify the door parameters.
The Job Preview screen is an interactive graphical representation of the Door Job parameters. The job can be viewed in a 2D or 3D representation.
The door can be viewed from different perspectives and can be zoomed in and out.
Preview Screen
You can preview the door data using the 2D/3D Preview tabs.

Door Axis Symbol
The door axis is a visual reference of the door orientation. Axis changes per Preview Surface selections.
- L: Length
- W: Width
- T: Thickness
Preview Surface
This is a textual reference of the door orientation.
- Top End
- Lock Edge
- Hinge Edge
- Bottom End
- Hinge Pivot Face
- Opposite Pivot Face
Scale
Enter the magnification value of the preview screen. (10 to 300 percent range)
Grid Line Display
Set the size of the gridlines. (0.1 inch to 1.0 inch range)
Grid Lines On/Off
Select the checkbox to toggle the gridlines on or off.
Show Jamb
Select the checkbox to toggle the display of the jambs.
Door Data
The Door Data Library includes files that contains the physical characteristics of the door. The panel on the right displays revision information about the selected file. This file can be pulled into Door Job files complete the raw door portion of the door job.
Since multiple files are created, there is a can be wide berth of file selections to different door jobs.
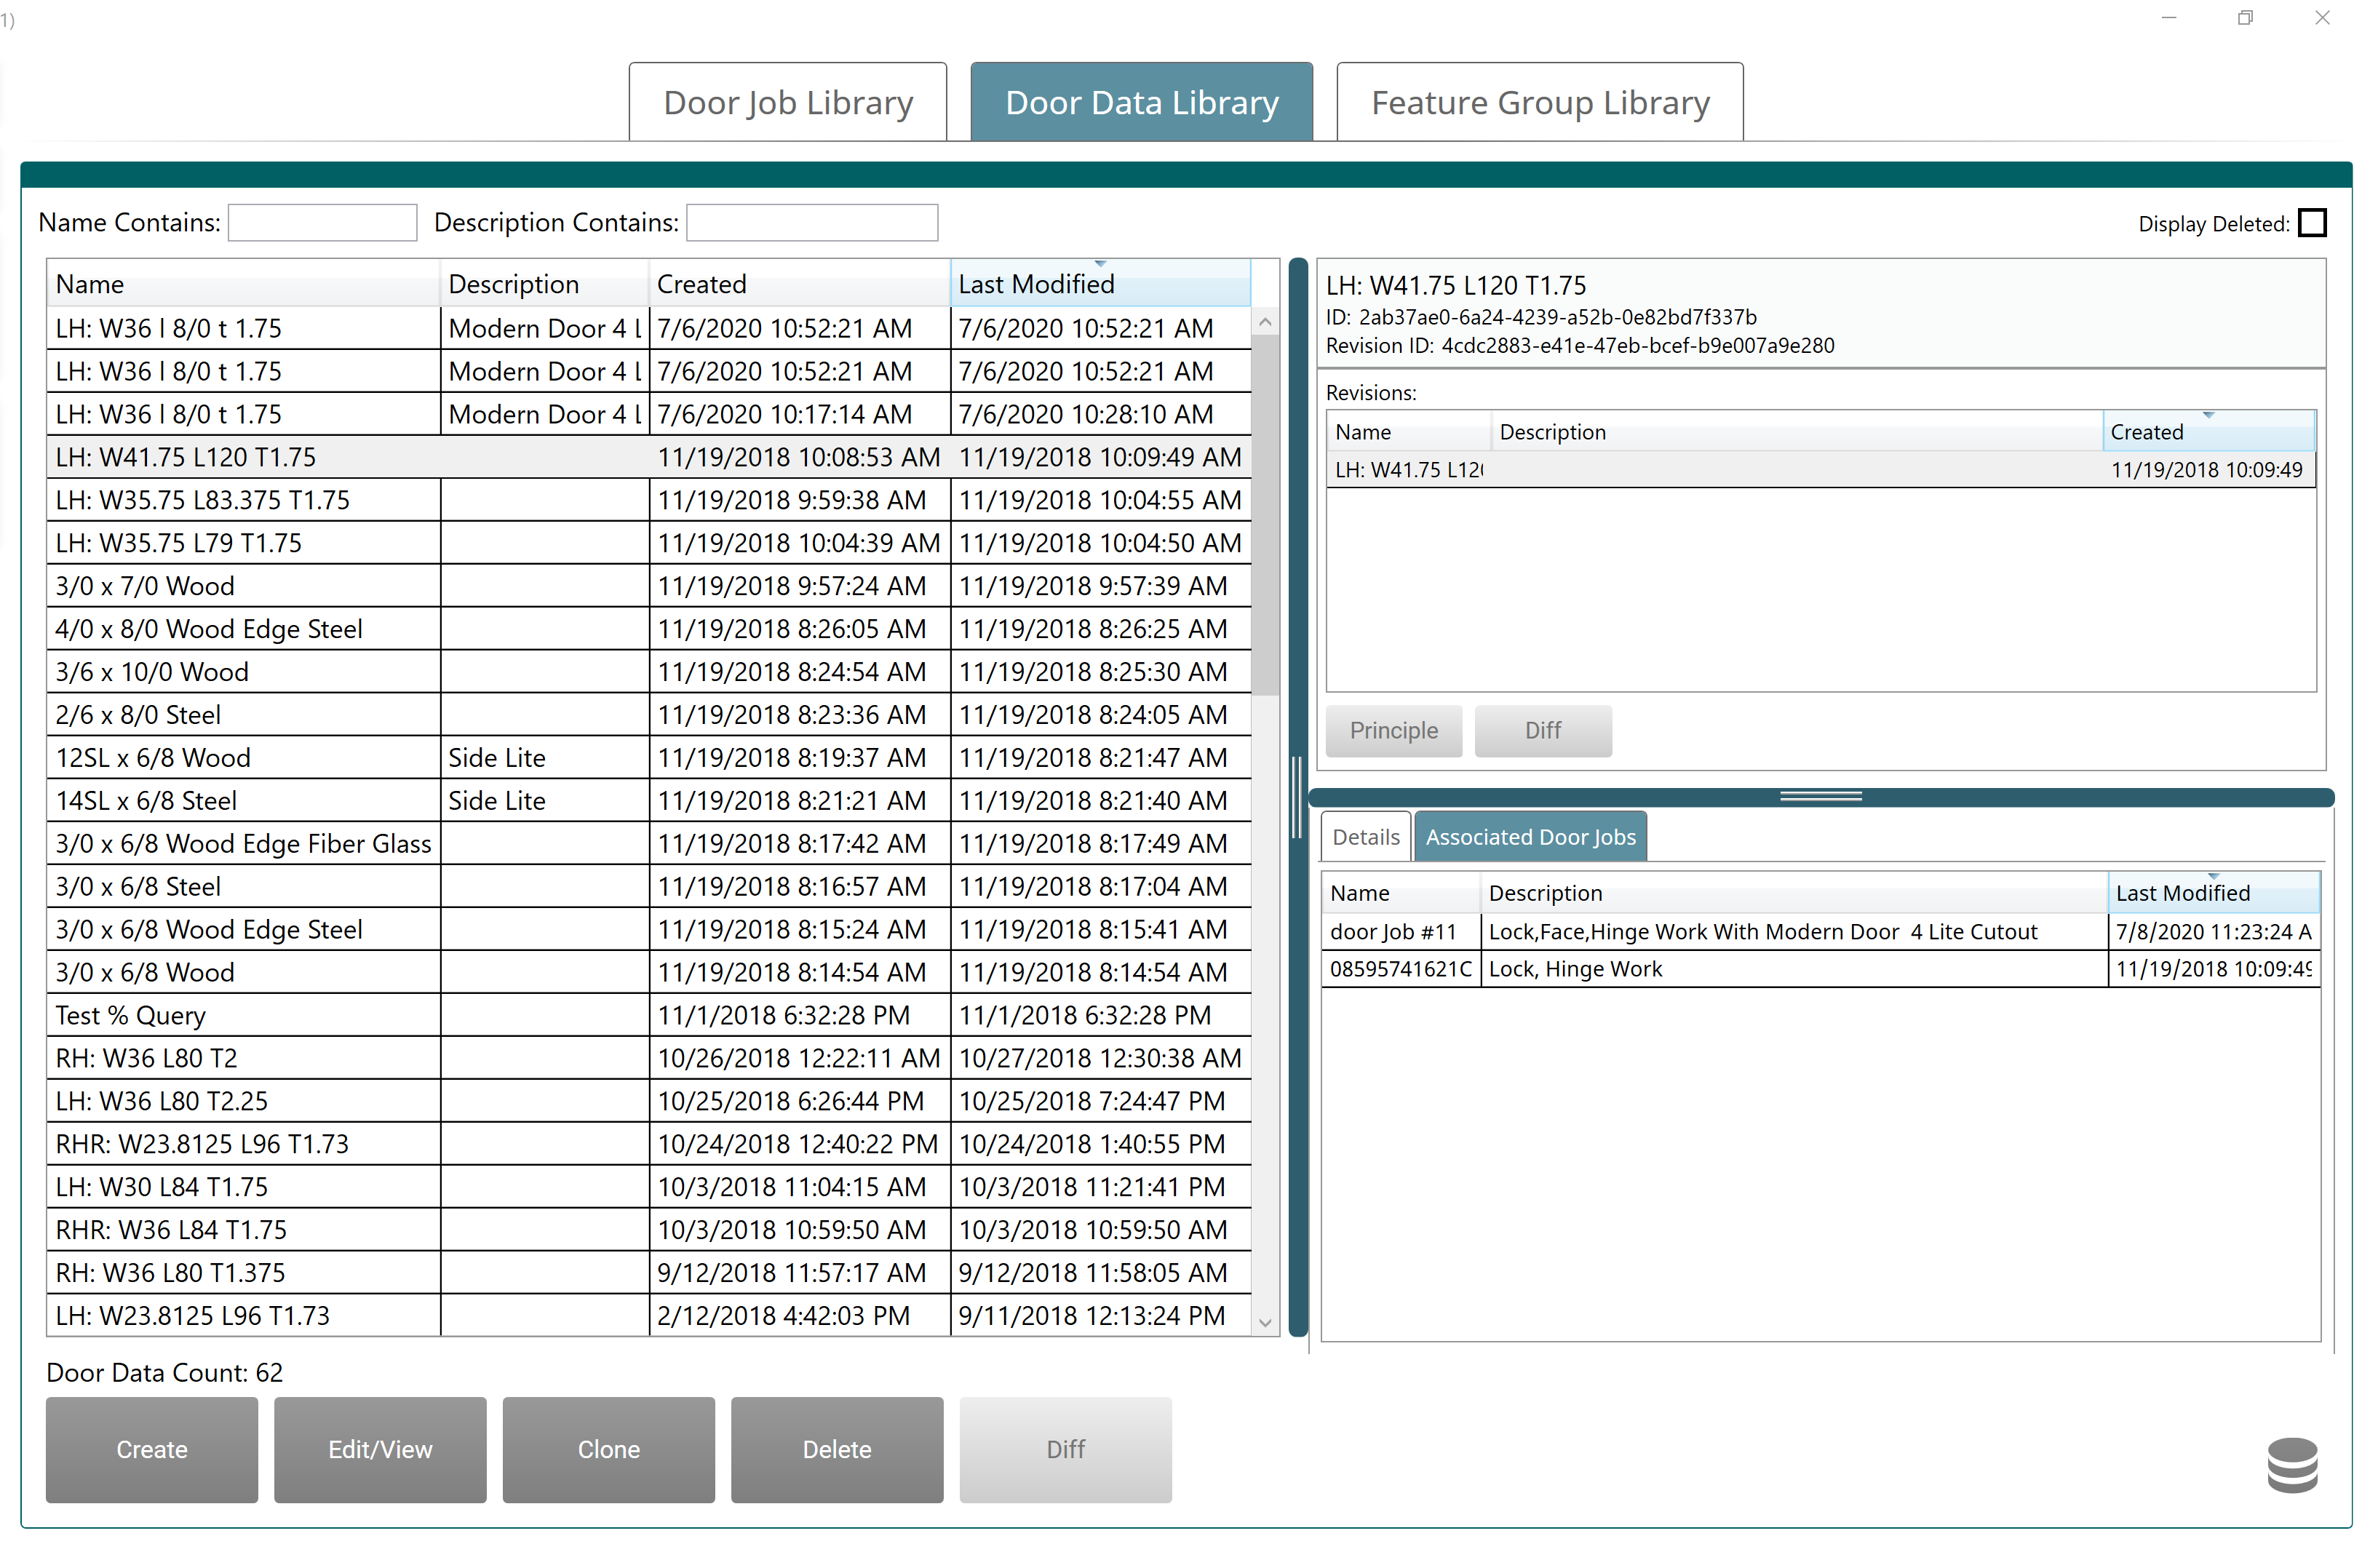
Detail and Preview Screens
You can preview the door using the 2D/3D Preview tabs.
Feature Groups
The Feature Group Library includes multiple files that contain the features of the door. These files are pulled into Door Job to process the door.
A hidden panel to the right displays revision information about the selected file.
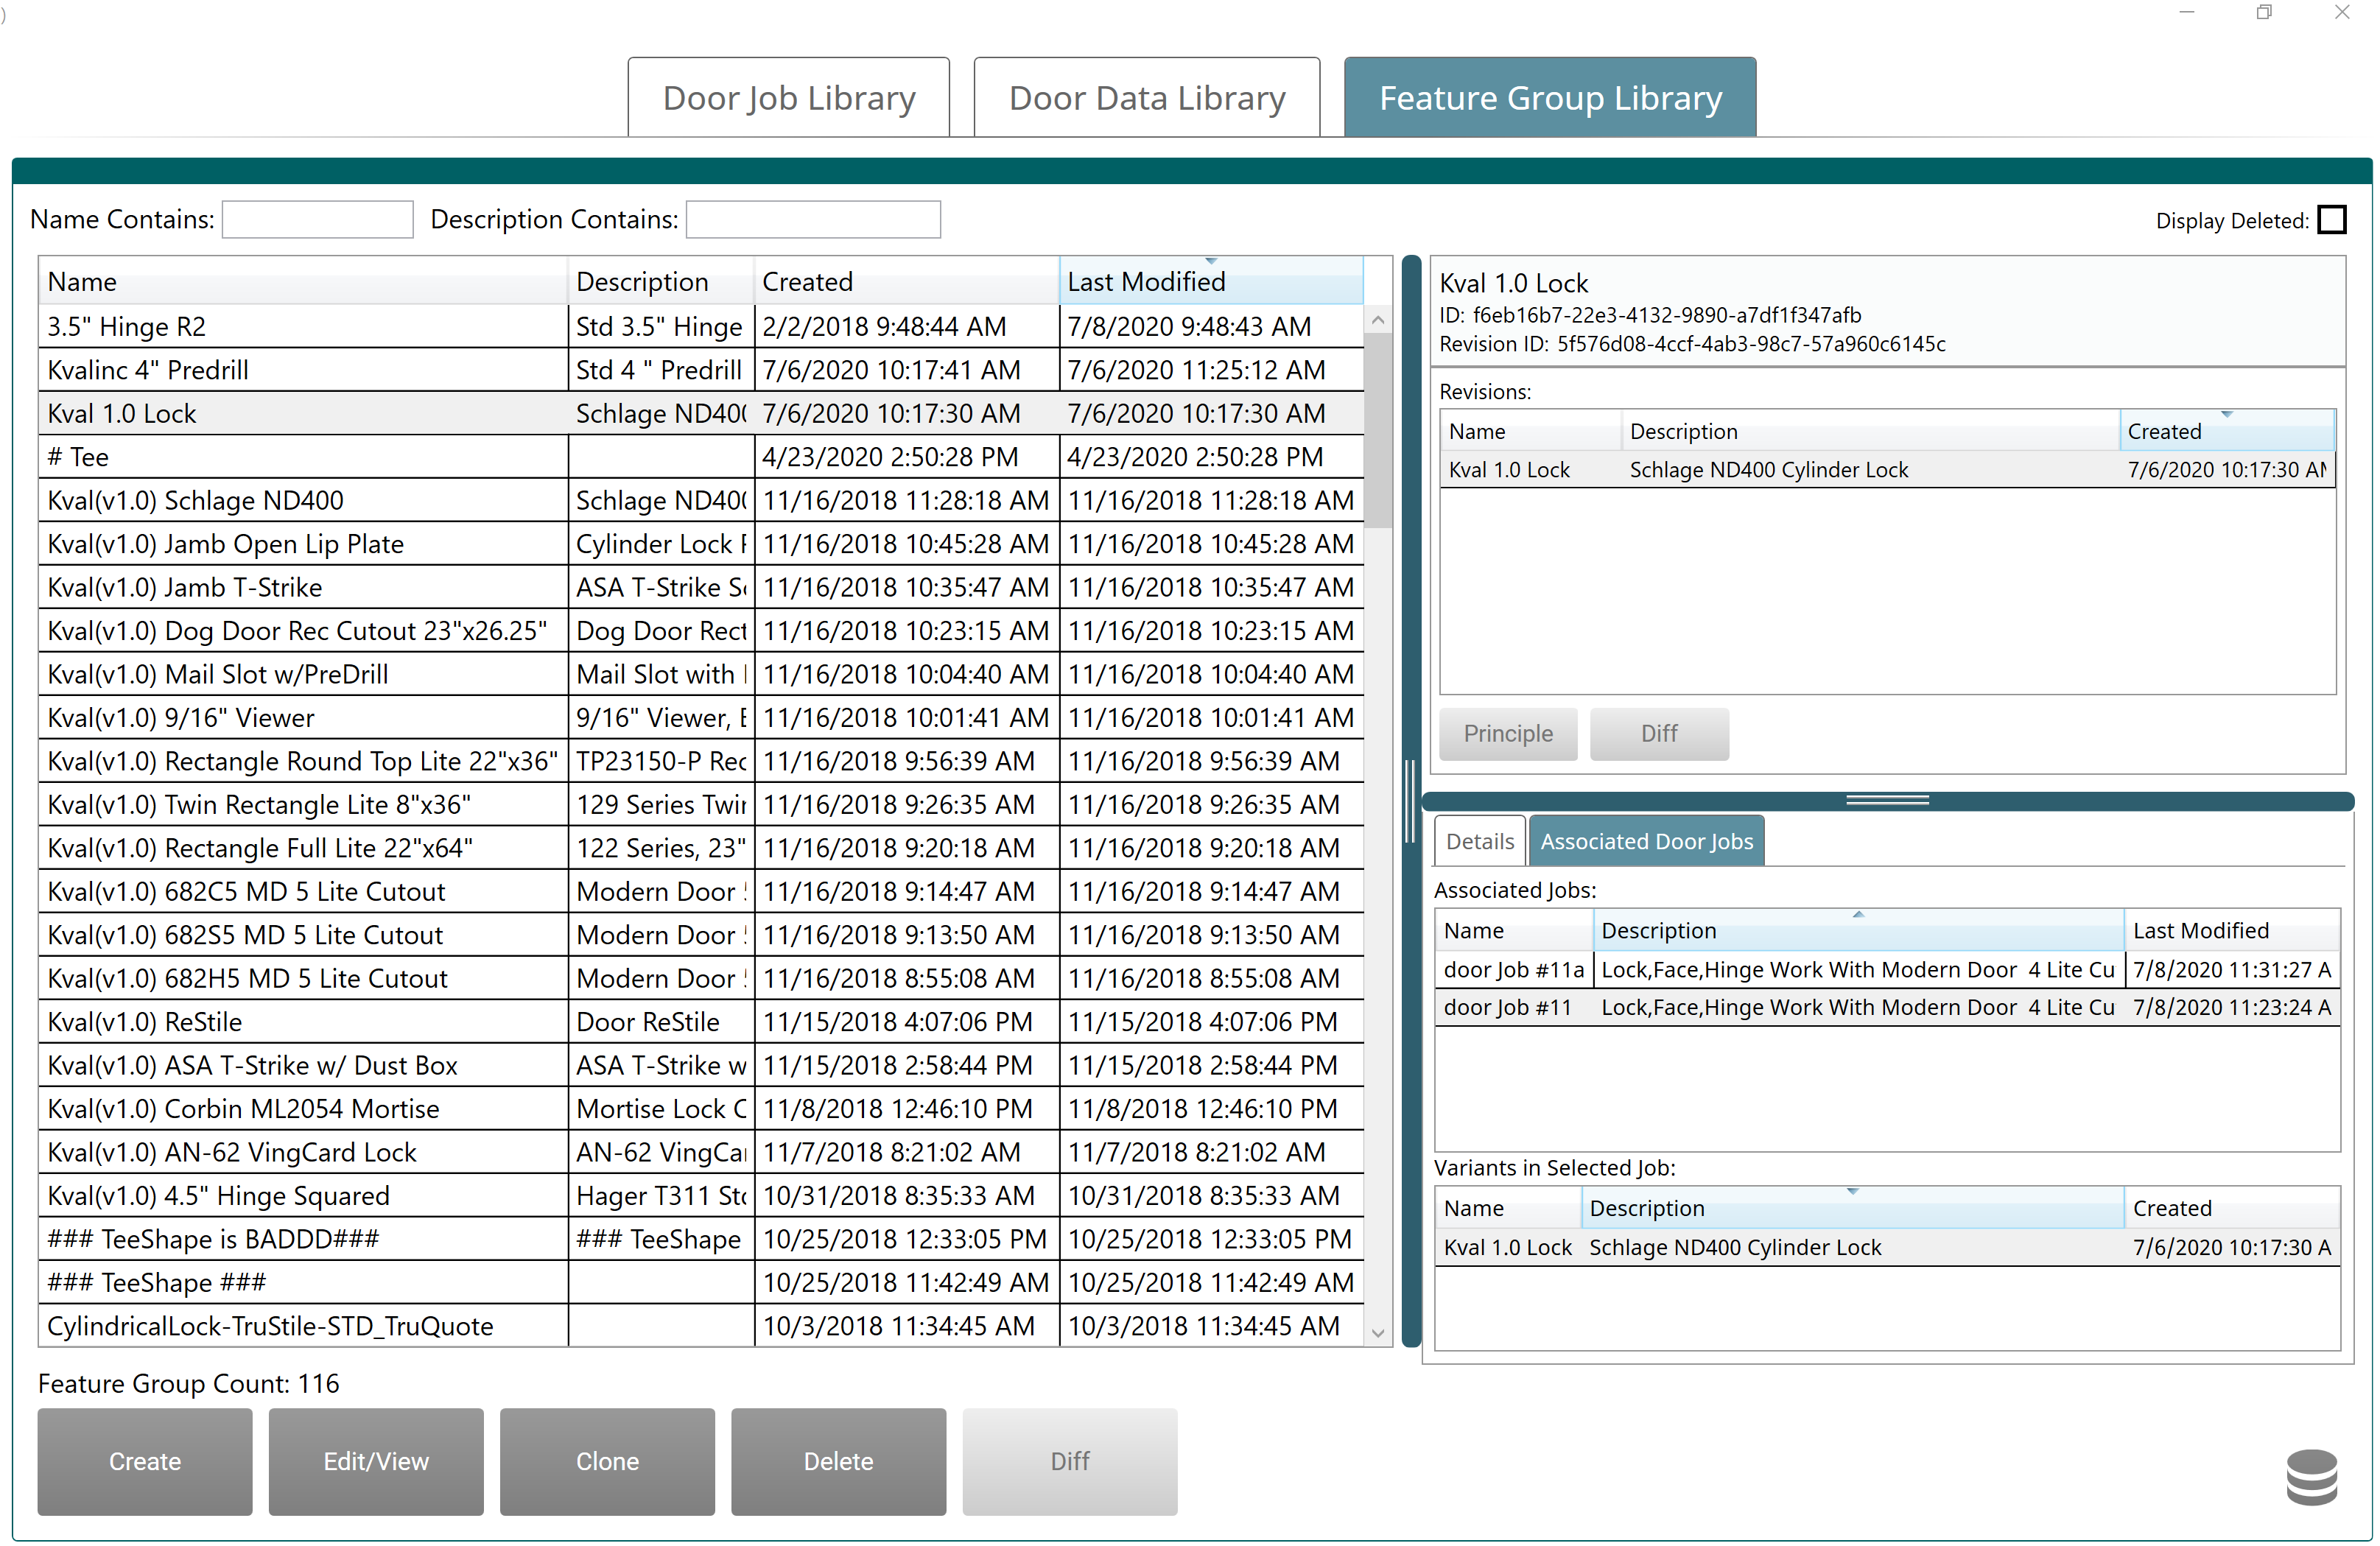
Detail and Preview Screens
You can preview the feature using the 2D/3D Preview tabs.